Showing posts with label Damask Decor. Show all posts

Tuesday, April 23, 2013

Spring Cleaning!

Spring is finally here! Time to put away all the winter clothes, open the windows for some fresh air and wash the windows to get rid of the grime and dust. With spring cleaning on my mind I thought it was a good time to update my blog. I used another free template,this time from The Cutest Blog on the Block.   I will want to personalize it some more but this is a good start.  I might even entice my son to help me customize it as he is good with Photoshop.

I haven't had much time to create and I'm really missing the creative energy that comes from spending a few hours in my craftroom.  Luckily, last night I put everything aside and made a few cards. 

I bought the Graphic 45 Place in Time and French Country paper pads online.  I love the crispness of the paper and the beautiful patterns.  I always hesitate to make the first cut but I will let this simple card speak for itself. 
Recipe: 
Cricut Fabulous Finds for the black frame
Cricut Storybook for the red checkered swirl flower
Cuttlebug Chicken Wire Embossing folder
Twine and button from my stash
 
The next card was made with a number of scraps from DCWV.  I had been wanting to try box pleating paper and it worked perfectly using my scoreboard.
 
Recipe:
Cricut Damask Decor for the 4 layer flower
Pearls, gem and ribbon for embellishment
 
 
Hope you're having some nice weather too and happy spring cleaning!


 photo DesignB__zps7f7c5b53.jpg

Wednesday, May 9, 2012

Card for Homemade Treats

Hello again!  I'm just on a roll with making cards and keeping my blog up to date.  Thanks for the lovely comments from those who drop by from other challenges.  It's always nice to get some feedback!

Today's card is for RAQ's Challenge on the Cricut forum and it is also part of the CPS Challenge for this week #264.  There were also ad colours suggested for RAQ's challenge.

So here is the sketch and the ad colours


I thought it would be really difficult to select papers in the ad colours that would coordinate nicely but I think it turned out fine.  With the warmer weather, I think I will need a card for a potluck BBQ dinner so I created this cute little card. 

I made the sunflower with my Cricut using the Stretch Your Imagination, Accent Essentials and Damask Decor carts.  I have a tutorial with photos on my blog that you can read here.  The corner diamond accents are leftovers from the argyle pattern cut.


Card Recipe
Coral and Yellow sparkle papers - DCWV Glitter
Coral checkered paper - K & Company Sweet Nectar
Blue with Birds - DCWV Green Stack
Skyblue base - Recollections
Ivory Base - Staples 110#
Cricut - Wild Card for Argyle cut
Cricut - Tags, Bags, Boxes and More for sentiment frames

I'm looking forward to the next BBQ dinner with friends!

Thanks for dropping by!

Thursday, April 26, 2012

Tags - à la Finnabair (Anna Dabrowska)

In July, I will have the great pleasure of taking part in a class offered by Anna Dabrowska (Finnabair).  It will be a mixed media class on an art journal where you'll make the cover and two inside pages.  Anna does some amazing work - journals, layouts, tags, etc. and I'm thrilled to have registered for one of the few classes that she'll be doing in Canada, and lucky me just a few minutes from my home . Finnabair blog

So today I was inspired to make a tag after browsing Anna's blog - and it is the perfect timing as I need one for friends that we will be visiting on Saturday. If you have taken a peek at Anna's work, you'll see that she does a ton of layering, inking and uses many of Tim Holtz' products on her wonderful creations.

Here is the finished tag that I made and I'm really happy with how it turned out!


I started by inking the ivory cardstock with distressed ink in Victorian Velvet, Broken China and Peeled Paint colours.  Then I placed a cut that I made from the Damask Decor cartridge (it's the green shape that you see peeking out).  I then added the victorian style heart (Cricut Everyday Paper Dolls cart), the gear is a chipboard shape that I had and I simply inked with Ranger Sienna ink. 

I then made the ticket using a Tim Holtz stamp and inked the ivory cardstock in Antique Linen, Spiced Marmalade and Vintage Photo distressed inks.  The ticket was attached using a Tim Holtz small hanger.  On the bottom right, I used the Cuttlebug Clockworks folder and inked the clock shape with Vintage Photo and cut it out by hand. 

In the center, I glued a piece of fabric border that had a string of sequins already attached. Next the flowers were made using cuts on the Cricut - Accent Essentials for both flowers. 

 For the small pinkish flower, I simply curled the petals of three layers in the same size and added a brad for the centre.  For the larger flower, I inked four layers (2 large, 1 medium and 1 small) and pinched/crunched the petals following Tim Holtz' grunge flower technique and added a pearl for the centre. 

Lastly you'll find a small flourish on the bottom left that I simply added a few brown pearl embellishments. 


I'd love to hear your comments on this tag!  Enjoy!

Wednesday, February 22, 2012

Sunflower

The weather is getting milder, the snow is melting away and I’m looking forward to Spring!  I’ve been spending a lot of my free time in my craft room making cards for birthdays, special occasions and even Christmas.  Along the way, I’m trying different things and learning new techniques particularly with inks and glimmer mist. 

I thought I would walk you through the steps of my newest flower creation – an amazing sunflower. I want to thank Elizabeth from 217 Creations for her wonderful tutorial that I followed and adapted.  To view her tutorial 217 Creations

SAM_0767

To begin, you’ll need a white cardstock – I used an ivory 110 lb cardstock from Staples.  Some Glimmer Mist in Jingle Bells and Distress Ink in Photo Vintage.  You can use a punch, Sizzix die or Cricut for the main petals.  I used Stretch Your Imagination cartridge cutting one at 2 1/2”, another at 2” and smallest at 1 1/2”.  Each petal is then sprayed liberally with glimmer mist on both sides.  Then dried with a heat gun, and inked the edges with distress ink.
SAM_0762

Next, to make the center part, you’ll need a kraft colour cardstock which I sprayed with Heirloom Gold mist.  You can again use a die or Cricut for the star shape.  I used Accent Essentials.  Each flower will take about 18 to 20 of these small flowers.  You then need to squish the flower around the end of a stylus or pen, dip it in glue (I used Aileen Tacky) and then place on the outside of the center of your smallest petal. 
SAM_0764

Then you simply assemble each layer putting some glue in between.

To use this sunflower on a card, I decided to add some greenery and feathers.  I cut the greenery from Damask Decor and at times not all pieces are attached (see the left corner piece below).  An easy trick to keep the shape intact is to use drywall mesh when removing the pieces from your mat.  You can easily flip it over to add glue before placing it on your card.
SAM_0769
So here is the final image, assembled and embellished. 
SAM_0770

I can’t show the card yet as it is for my sister’s birthday….in June! 

Hope you're enjoying your free time too!

Wednesday, November 2, 2011

Theme of the day "Happy Anniversary"

My dear family and friends celebrated their wedding anniversary over the past few months - ranging from the 4 year mark to 55 wonderful years of wedded bliss.

For my dear nephew and his wife - the perfect pair card:


Recipe:  Recollections turquoise blue cardstock, scraps from SEI Oasis
Sweethearts Cartridge for the shoes and "perfect pair" phrase
Stamp Autumn Leaves
Pearl ribbon embellishment and "dream" grommet
The interesting fold for this card is a technique from Yoliebean


The next card was for my dear BFF and her husband:
Recipe:  Card base DCWV Shimmer Stack
Damask Decor Cartridge for the bird and intricate shape
"Joyeux Anniversaire" stamped on vellum

Next card was for my dear sister and her husband:

Recipe:  DCWV Shimmer stack for base and layers
Ornamental Iron Cartridge for "gate" cutout
Autum Leaves for Happy Anniversary stamp

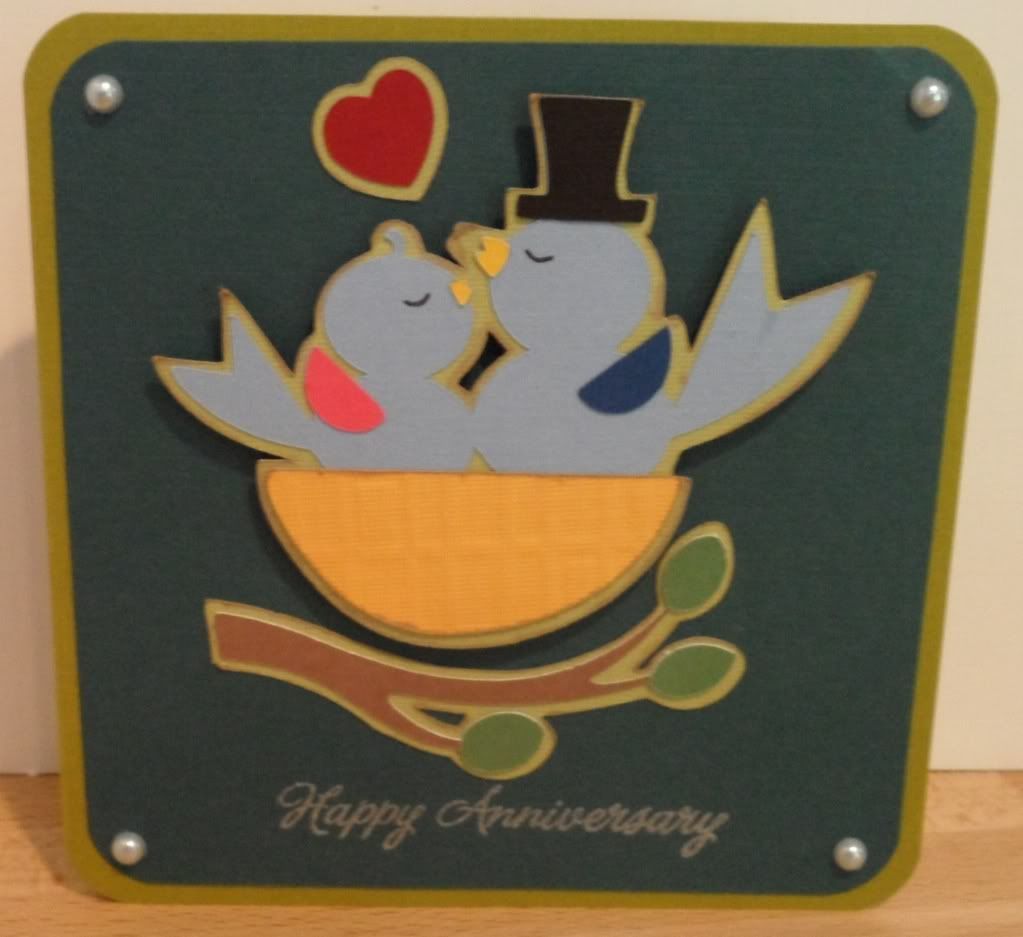
And last, but not least, the card for my dear parents celebrating their 55th wedding anniversary:
Bazzil Green for base and dark blue for layer
Sweethearts Cartridge for Lovebirds
Mini  pearl embellishments and stamp with embossing powder

I will be back soon to give you more updates of my work!


Tuesday, June 7, 2011

Anniversary Cards - June

It has been a very long time since I've posted on my blog!  The good news is that I have been creating a lot of cards this past month - for birthdays, wedding anniversaries, end of school year celebrations and even a few Christmas cards.

So tonight, I will first show you the anniversary card that I made for my dear brother and his wife.  They celebrated 31 years of marriage and I wish them many more years of happiness!


I used Damask Decor for the cut on the front using a DCWV Shimmer Stack cardstock.  It is such a pretty cartridge that does such nice intricate cuts.  I simply embellished the front with a navy ribbon with sequins.  Inside, I made the "Love" accent with a stamp, embossing powder and a metal tag.  Simple yet elegant!

The next anniversary card was for my niece and her husband.  They were celebrating their second wedding anniversary.  Their wedding colours included purple so that was the theme for my card.  I wish them also much happiness and love for many years to come!


I used Elegant Edges for the card design in deep purple, the vellum and the white cardstock.  The girl and boy were from A Child's Year cartridge using the shadow function too.  I stamped the Happy Anniversary on the front and inserted a small daisy on the inside along with the full sentiment.  I just added a few purple brads to finish it off. 

It's been fun using the Cricut and my new cartridges - Damask Decor and Elegant Edges.  I'll be posting more this week. Stay tuned!