Showing posts with label Stretch Your Imagination. Show all posts

Saturday, June 2, 2012

A day at the beach

It's still Spring here but I made this card for my SIL who lives in Italy and loves to take her children to the beach.  I made it as part of this week's RAQ Challenge on the Cricut forum and also to submit to My Sheri Crafts Summer Challenge

Card recipe
Papers - DCWV Songbird, Bazzill, clear acetate
Sew Easy for the piercing for the stitching
Cricut A Child's Year, Elegant Edges, Stretch Your Imagination
Embellishments: Brads, buttons, pearl and photo corner
Versafine ink for "Just Saying Hello"

I started the design with a port hole and then just chose the elements from my Cricut cartridges.  It's the first time that I've used the Sew Easy that I bought over a year ago.  It's not the "easiest" tool to use on heavy cardstock but it does add a nice touch!

Enjoy your day and thanks for dropping by!


Wednesday, May 9, 2012

Card for Homemade Treats

Hello again!  I'm just on a roll with making cards and keeping my blog up to date.  Thanks for the lovely comments from those who drop by from other challenges.  It's always nice to get some feedback!

Today's card is for RAQ's Challenge on the Cricut forum and it is also part of the CPS Challenge for this week #264.  There were also ad colours suggested for RAQ's challenge.

So here is the sketch and the ad colours


I thought it would be really difficult to select papers in the ad colours that would coordinate nicely but I think it turned out fine.  With the warmer weather, I think I will need a card for a potluck BBQ dinner so I created this cute little card. 

I made the sunflower with my Cricut using the Stretch Your Imagination, Accent Essentials and Damask Decor carts.  I have a tutorial with photos on my blog that you can read here.  The corner diamond accents are leftovers from the argyle pattern cut.


Card Recipe
Coral and Yellow sparkle papers - DCWV Glitter
Coral checkered paper - K & Company Sweet Nectar
Blue with Birds - DCWV Green Stack
Skyblue base - Recollections
Ivory Base - Staples 110#
Cricut - Wild Card for Argyle cut
Cricut - Tags, Bags, Boxes and More for sentiment frames

I'm looking forward to the next BBQ dinner with friends!

Thanks for dropping by!

Wednesday, February 22, 2012

Sunflower

The weather is getting milder, the snow is melting away and I’m looking forward to Spring!  I’ve been spending a lot of my free time in my craft room making cards for birthdays, special occasions and even Christmas.  Along the way, I’m trying different things and learning new techniques particularly with inks and glimmer mist. 

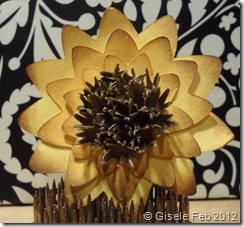
I thought I would walk you through the steps of my newest flower creation – an amazing sunflower. I want to thank Elizabeth from 217 Creations for her wonderful tutorial that I followed and adapted.  To view her tutorial 217 Creations
SAM_0767

To begin, you’ll need a white cardstock – I used an ivory 110 lb cardstock from Staples.  Some Glimmer Mist in Jingle Bells and Distress Ink in Photo Vintage.  You can use a punch, Sizzix die or Cricut for the main petals.  I used Stretch Your Imagination cartridge cutting one at 2 1/2”, another at 2” and smallest at 1 1/2”.  Each petal is then sprayed liberally with glimmer mist on both sides.  Then dried with a heat gun, and inked the edges with distress ink.
SAM_0762

Next, to make the center part, you’ll need a kraft colour cardstock which I sprayed with Heirloom Gold mist.  You can again use a die or Cricut for the star shape.  I used Accent Essentials.  Each flower will take about 18 to 20 of these small flowers.  You then need to squish the flower around the end of a stylus or pen, dip it in glue (I used Aileen Tacky) and then place on the outside of the center of your smallest petal. 
SAM_0764

Then you simply assemble each layer putting some glue in between.

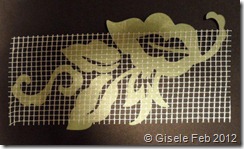
To use this sunflower on a card, I decided to add some greenery and feathers.  I cut the greenery from Damask Decor and at times not all pieces are attached (see the left corner piece below).  An easy trick to keep the shape intact is to use drywall mesh when removing the pieces from your mat.  You can easily flip it over to add glue before placing it on your card.
SAM_0769
So here is the final image, assembled and embellished. 
SAM_0770

I can’t show the card yet as it is for my sister’s birthday….in June! 

Hope you're enjoying your free time too!